Author Archives: mpickell

About mpickell

I'm a java developer

Moving to mpickell.com

I finally got around to setting up my own wordpress site… I can finally use syntax highlighters and whatever other plugins i want — wooooo!!!

Anyway, i’m going to eventually repost all posts here with a link to there so they are easier to read.

For now, check out my newest post on Converting an old Scoop CMS to WordPress at mpickell.com!

I’m still working on the site, I just threw it up there today.  so it looks a little “out of the box” right now.


Fixing authors when importing a split WXR file for WordPress

If you have a large WordPress Extended RSS import file, WordPress suggests that you split the file in order to create multiple smaller files.  If you do this, then each file will have the same authors.  If you import the second file, third, fourth, etc… then those authors will be seen as duplicates and dropped (and all imported posts will be credited to ‘admin’) unless you go through each author and select them in the “or assign this post to existing author” combo boxes.   These combo boxes become available after you select a file and press “Import.”

If you are importing multiple files because a single one is too big, there is a chance you could have way too many authors to go through each one and do this.  This post describes a hack method of populating all of these combo boxes using jQuery and the browsers development tools.

I had to import 6 WXR files that i created, each one around 80Megs, and a total of almost 500 authors.

1) Get jQueryify here and add the bookmarklet per the instructions.

2) When you get to the “assign authors” page, right-click on the browser page and select “Inspect Element” (Chrome), or “Inspect with Firebug” in Firefox (install firebug if you haven’t already). In IE press F12 to start the Dev Tools.

3) Press the jQuerify bookmarklet button that you installed from step 1. This will turn on jQuery for the page.

4) Go to the console tab, enable the console if you need to, paste this code in and press RUN:
jQuery.noConflict(); //Disable jQuery $ just incase.

jQuery('#authors li').each(function() {
// Get the author login text
var username = jQuery(this).find('strong').html();
var author_login = jQuery.trim((username.split('('))[0]);

//Figure out which option this author is in the drop down.
var selectOptionval = -1;
jQuery(this).find('select option').each(function(){
if (jQuery(this).html() === author_login) {
selectOptionval = jQuery(this).val();
return false;//quit .each() early.
}
});

// Set the combo box to this author's option key.
jQuery(this).find('select').val(selectOptionval);
// For test...
//console.log(author_login + ": " + selectOptionval);
});


jQuery ready function with holdReady

I used this the other day in GWT, prior to backing it out and placing style classes in better places so i could use straight CSS targeting.  But, I thought it could be useful and it uses the new jQuery.holdReady function so here it is.

My goal was this: In order to get the correct horizontal scrollbar in a GWT app, I had to target the div right ABOVE the root div placed in my Root View (which contains the structural layout of my page). I used jQuery to target that div, but they went back and placed a styleclass in the RootLayoutPanel widget instead so that i could target this more cleanly (within GWT) with CSS’s :nth-of-type / :nth-child selector.  I found the exact DIV that i needed to target by placing overflow-x: auto !important on all the parent divs until it worked ‘correctly.’

The ‘pageScrolling’ style class is defined with only overflow-x: auto !important

/* Startup functions */

/*
* First, place a hold on the document ready function… GWT loads more stuff
* after the DOM loads, and we need to add a little extra delay to account for that.
*
* By using document ready and hold ready together, i am able to make sure that the
* startup function runs after the page is completely ready.
*/
jQuery.holdReady(true);

// Set up the on-DOM-ready function
jQuery(function($) {
// Find the DIV that should handle scrolling for the “body” and mark it
$(‘.myRootPanel’).parent().addClass(‘pageScrolling’);
});

/*
* GWT needs to create its structure, which happens after DOM loads??
* Therefore, hold the document READY function until an expected element
* is detected
*
* (ps.. This holds ALL jQuery ready functions anywhere the system… if there are any)
*/
var waitForPageToLoad = function() {
if (jQuery(‘.myRootPanel’).size() > 0) {
// it exists now.. trigger the ready function
jQuery.holdReady(false);
} else {
// Doesn’t exist yet.. wait some randomly selected time period.
setTimeout( waitForPageToLoad, 200 );
}
};

/*
* Trigger the timeout function to wait for the page to REALLY load,
* and then release the document READY hold.
*/
waitForPageToLoad();


Dynamically remove blank cells from a column in Excel

This is another Xcelsius issue i had — but the solution is usable in any excel spreadsheet.

I wanted to create a fake drop down (custom image w/ little arrow like most web pages have now + push button + list box) that i could set up with dynamic options — dynamic meaning different options based on different states of the dashboard, not adding or removing new options at runtime.  The problem was that i needed to link to a range in the Excel spreadsheet that gave me the currently available options and did not have blank spaces between them.  I hunted on the internet and found an example, but it used functions that are not available in the Xcelsius-enabled list of Excel functions.

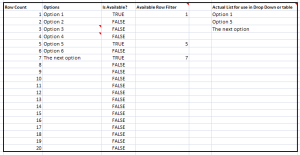
So I edited it to be Xcelsius-friendly and here it is (click on this pic to see a larger version):

Table layout for dynamically removing blank cells

Basic table layout for setup

  • Column 1 (H): a row number that is copied across to column 4 when the option text is marked as “available” in column 3.  these are hardcoded numbers.  Xcelsius doesn’t support the ROW function.
  • Column 2 (I): The table of data.  In my case it doesn’t have spaces, but effectively does when i have certain options marked as “unavailable”.
  • Column 3 (J): A formula that is unique for each row and determines if THAT row should be available.  This checks the status of different things in the Xcelsius file (e.g., the dynamic visibility of other components in order to determine what tab on on, etc) and determines when this option should be available in my faked-out combo box implementation.  If you have data that has spaces in it that you are removing, this row can check for that or (even better) just combined with column 4.
  • Column 4 (K): A filter.  If this row is “available”, then this cell is set equal to the row number in column 1.
  • Column 5 (L): blank… i left it there for spacing, or maybe for adding something later… i don’t know.  I can’t remember.  but it is blank.
  • Column 6 (M): The magic happens here… Keep reading

The function in Column 6 is this, the column letters are defined in the column definitions above (i.e., column 1 is H) and the first row of that table was at row 30:

=IF(ISERROR(SMALL($K$30:$K$49,H30)),"",INDEX($I$30:$I$49,SMALL($K$30:$K$49,H30)))

To break this down:

  1. ISERROR(SMALL($K$30:$K$49,H30)),””…: The first part here checks if there is a next smallest value in column 4.  if there is, it continues to the INDEX function, otherwise it leaves the cell in column 6 empty.  Column K is the sparsely populated filter column (aka column 4), and the “n” in the “nth next smallest value” comes from column H (the rownum).
  2. INDEX($I$30:$I$49,SMALL($K$30:$K$49,H30)):  Since we know an “nth next smallest value” exists in the filter column, this pulls the “option text” in column 2 (i.e., the table data) corresponding to that row number.  the row number starts at 1 for the first row, so it is equal to the “index” of that row when using the INDEX function.
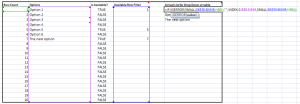
Here is a screen shot to help you line up the formula to the columns.  If you setup the first cell in column 6 with the same “$” that i use for static cells, then a copy-down will fill in that whole column correctly:
Options table with formula 1st row

Showing the super awesome formula in the last column

It is actually pretty simple and useful.  I simplified it as i wrote it here because i found a function that I was using that was redundant, but in case it solved some other issue that i don’t have and can’t think of, here is it:

=IF(ISERROR(SMALL($K$30:$K$49,H30)),"",INDEX($I$30:$I$49,MATCH(SMALL($K$30:$K$49,H30),$K$30:$K$49,0)))

.   The MATCH at the end there is redundant.  In my example, the relative index is also equal to the “nth next smallest value” in the filter column — so i’m doing a MATCH using the SMALL function to get the same number the SMALL function already returns.  It is useful to write these posts and fix my own code!

I’m not maintaining this blog here so commenting is closed… Please see this same post on my new site to ask questions:http://mpickell.com/blog/2012/03/05/dynamically-remove-blank-cells-from-a-column-in-excel/


BI: Using combo boxes to get things done in Xcelsius

I was on a project recently working with dashboarding in SAP Business Objects and I found a couple things that helped me out so i wanted to put them up here.  I’m heading back to the land of web development so i’ll document these things before I forget them.

This post is one about using combo boxes in Xcelsius to actually do some things.

Xcelsius is a dashboarding tool — not a UI tool.  I’m used to UI tools which let me use callbacks and events,etc.  Xcelsius is very simple and only lets you do simple actions. Everything is based on performing some action (e.g., press a button), change some value in the attached Excel spreadsheet, and (typically) hide or show some other things based on that value you just set.  So you see here that for a given action, you can only (easily) perform one data movement (called data insertion).  There are other components, like tables, that will sometimes let you move more data when you click or hover (your only two event options… and they cannot be used at the same time on the same component), but most let you do a single thing.

With combo boxes, you can do more.  I do not know if this is an intended feature or not, but you can set up hidden combo boxes to watch for that “single thing” that most components do, and then perform a lot of data insertions.  This, along with some nice excel functions, allows you to cross into the realm of making the dashboard act like a more complex UI.  I didn’t find any good write-ups so here is mine.

Anyway, here’s the idea:

A couple things to know to start…

  1. A combo box ONLY watches for the trigger and performs the data insertion when it is “visible”. This means that if it is hidden because of its Dynamic Visibility setting on the Behavior tab, OR if it is on a canvas that is not current visible, etc, then it WILL NOT RUN. This is GOOD. it allows additional control to help avoid getting into data insertion loops or having timing issues.
  2. While a combo box only runs while it is “Dynamically Visible,” any functions (like IF statements) that you put in the spreadsheet cells continue to run all the time.
  3. If you are using the combo box for data insertion only and do not want the user to interact with it, you need to hide it so it is not “physically” visible when it is set to be “dynamically visible” (ie, put it behind another component so it runs but isn’t seen.) You need to move it up or down in the Object Browser to get it to the right place for it to (a) run when you want it, and (b) not be seen if you don’t intend it to be.
  4. I have noticed that the combo boxes executed in the order they are placed from TOP TO BOTTOM in the object browser.

The settings you need to use it for Data Insertion…

When you add the combo box, it is very simple to set up. This is the way i use it for data insertion. If you know a new way, edit this document!

Behavior tab

  1. Set the TYPE to “Label” and the ITEM to the cell you want to WATCH.  This means the cell you are watching is your trigger cell. When this cell becomes equal to a value that is in your list of “labels” (that you will define on the General tab), then the data insertion will occur.

General tab

  1. Set the LABELS cell or range to values that are valid for kicking off this data insertion. These would be what are shown to the user in the combo box if it was visible.
  2. Set the “Clear destination when no selected item” if you want that… make sure to consider if you have other people (“components are people, too”) copying data to this destination under different circumstances.
  3. Set the radio button at the bottom to “Data change and interaction” — “Interaction only” doesn’t make sense for a hidden component.
  4. Finally, set up the data insertions!
    1. If you select Filtered Rows, then you can only have one data insertion. I’m not sure if the labels and the filtered rows have to match up or not for this. If you want to move multiple rows, like a whole table, then you need to use this one. I could not get a large block of data to move when using data insertion types other than this.
    2. Any of the other insertion types can have multiple data insertions in the queue. This is great… off of one trigger you can rearrange all kinds of stuff, and the source and destination do not have to have any relation at all to the labels or trigger cell. Examples are:
      1. Value: This will move ONLY a single value from one cell to another.

        Important Note: Per the Xcelsius 2008 user guide ( and my experience ), it is REQUIRED that the VALUE data insertion SOURCE range is equal in size to the LABEL range. This requirement can lead to some columns in the dashboard spreadsheet basically being hardcoded, repeated identical value columns if that is what you need.

      2. Row: This will move a single row… not multiple.. (at this is what i saw when testing).
      3. Column: This is like ‘row’ except it moves only a single column

Additional Note:

Avoiding selection memory in the combo box: You may want to set the Item field to a cell. This is on the Behavior/Common tab of the combo box component. If you are using the combo box behind the scenes, or if you have it visible with only one selectable item, then once a list item is selected you may not be able to select it again until a different item is selected (or not at all if you only have one item in the list). A solution for this is to set the Item field equal to the Insert Selected Item field, and then make sure that you clear that cell after a selection was made and the action performed (ie, make the last data insertion in the combo box move a blank value to that cell). By keeping that cell cleared after a selection is made, and by having these two fields equal, there will never be a “pre-selected” item in the list.

So that’s it.  You can use combo boxes to do more in Xcelsius.  Let me know if this helps you out!

I have two more write-ups that i will do when i have a chance:  One is an useful excel function that lets you take a column of blank and populated cells and compress them into a single column without spaces, and the other shows how to create a counter using the History component.
I’m not maintaining this blog here so commenting is closed… Please see this same post on my new site to ask questions: http://mpickell.com/blog/2012/02/08/bi-using-combo-boxes-to-get-things-done-in-xcelsius/